Tag Archives: Maya
Maya at SIGGRAPH 2015: Catching up with MPC
Maya at SIGGRAPH 2015: Catching up with Image Engine
Autodesk Maya 3D HoloLens Demo at WPC
Making Maya Easier To Use
PixelBump – RenderMan vs Arnold in Maya
Golaem Crowd Blend Shapes Demo
Maya 2015 Extension 1 New Feature Video: Color Management & Performance Profiler
Maya 2015 Extension 1 New Feature Video: Productivity Enhancements
Autodesk Mudbox and Maya interoperability in the Entertainment Creation Suite 2015
Maya Monday IBL v2
Create Volumetric Clouds using Maya Fluids

In this tutorial we will use Fluid Shape node's in-built texturing capabilities to create volumetric clouds.
Cryengine: 3 – Technology Showcase
Maya 2012
Autodesk® Maya® 3D computer animation software delivers an end-to-end creative workflow with comprehensive tools for animation, 3D modeling, visual effects, 3D rendering, and compositing on a highly extensible production platform. Autodesk® Maya® 2012 software delivers new features and toolsets for previsualization and games prototyping, extended simulation capabilities, and improved pipeline integration. It delivers viewport and sequencer enhancements, node-based render passes, editable motion trails, and a new library of 80 Substance procedural textures.
Viewport 2.0 Enhancements
Node-Based Render Passes
Editable Motion Trails
Sequencer Enhancements
Substance Procedural Textures
Craft Animation Tools
Enhanced, Multi-Product Animation Workflows
New Simulation Options
Rigging 101
| http://www.rigging101.com/freestuff.htm
Javier Solsona (a.k.a. Goosh) is a wandered, a traveler, a “Citizen of the World”. He was born in Argentina and grew up in Patagonia. From an early age, he started doing graphics on his Commodore 64 at home, painstakingly painting pixel by pixel. Many years later still in front of a computer he got a B.Sc. in Computer Sciences from the University of Cape Town (UCT), South Africa. During his last year at university in 1995, he was introduced to Multimedia and 3D and there was no looking back ever since.After finishing his degree, he moved to Brazil where he carried on studying 3D animation on his spare time while taking part on various 3D courses. Later, he moved to London, UK where he worked for three years as a freelance graphic artist for various hi-tek companies including Cisco Systems. He finally moved to Vancouver, BC where after working for a year as a creative director in a small company, decided to leave his secure position and go back to school to complete his education. He studied for six intense months at the Vancouver Film School in their Character Animation program. After his completion, he was awarded a scholarship for his efforts in his final film. Once out of school, he got a position at Lost Boys Studios in Vancouver working on their 3D department as a visual effects artist doing Commercial Ads, Game Cinematics and Music Videos. Later on, he made the jump to EA Canada. He was one of the cinematic animators on DefJam Vendeta, DefJam Fight for NY and in-game animator on SSX on Tour. He moved on to Propaganda Games, a Disney Interactive Studio, as the lead Creature Technical Director where he worked on the new instalment of Turok. He can now be found at DreamWorks working as a character TD on Shrek4 and other upcoming movies. On his spare time, when he is not climbing mountains, he does freelance jobs in rigging and animation. Outside of work, Javier is an avid traveler, photographer, skier, and kite-boarder. His photography work can be found in www.javiersolsona.com
None of the rigs, tutorials or scripts may be used for business purposes without specific prior written permission. They are available for free and personal use only.
|
||
| GreatDane – Facial (modeled by Chris Baker) The new GreatDane with the help of Jesse Davis who added the facial setup. Download model (Maya 2008 and higher) |
||
| GreatDane (modeled by Chris Baker) The Original Quadruped Rig built for the Autodesk MasterClass “Quadruped Animator Friendly Rigging”. Only the segmented mesh with the control rig is available. There is no smooth skin nor facial setup yet. Download model (Maya 8 and higher) |
||
PackageMan v1.2  How to use (PM modeled by Bob White) How to use (PM modeled by Bob White)Fully rigged character. Facial Setup, IK/FK spine, IK/FK arms and a whole lot more. Download model (Maya 5 and higher) |
||
 |
Troll (Troll modeled by Kenn Klick) Character ideal for animation. Comes fully with facial set-up, IK/FK amrs, IK/FK spine and the works. Download model (Maya 4 and higher) |
|
 |
Super Gramps (SG modeled by William Vaughan) Character and rig built in the “Zero to Hero” CD. Download model (Maya 4 and higher) |
|
 |
IK-Joe (IK-Joe modeled by Daniel Martinez Lara) Fully rigged character ready to be animated. IK/FK switching, Reverse Foot Lock, IK/FK Spine and more. Download model (Maya 4 and higher) |
|
 |
IK-Joe v2 A similar, yet different rig to IK-Joe v1 for those that feel comfortable with other controllers. This version is a little bit more advanced and comes with an additional facial setup. Download model (Maya 5) [Download model for Maya 4.5] |
|
|
IK-Joe v3 Yet another different rig for IK-Joe. This version has a very nice, simple yet advanced facial setup, plus quite a few new goodies. Maker sure to read the PDF file for some insight on v3. Download model (Maya 5) |
|
|
IK-Joe XSI  (Rigged by Stefan Anderson) (Rigged by Stefan Anderson)Stefan Andersson made available his XSI version of the popular IK-Joe. This time for XSI users. Download model (XSI 3.5.1) |
|
 |
IK-Jane Fully rigged character ready to be animated. IK/FK switching, Reverse Foot Lock, IK/FK Spine and more. The ideal companion for Ik-Joe and the same setup as IK-Joe v2. Download model (Maya 5) [Download model for Maya 4.5] |
|
| TUTORIALS
|
||
 |
How to use Utility Nodes Utility nodes can be an incredible thing to master. They might look scary and confusing in the beginning but once… Go to tutorial |
|
 |
Solid knee in IK leg. You need a solid IK knee twist so that the character can do flips and any kind of movement without the knee causing any problems Go to tutorial |
|
 |
Working with Expressions and Constrains Expressions and constrains are extremely powerful and a riggers closest friend… Go to tutorial |
|
 |
Reverse Foot Lock The Reverse Foot Lock setup is an external set of bones that drive the foot of a character… Go to tutorial |
|
 |
IK/FK Switching IK/FK switching set-up is mainly used for the arms. But it can be implemented in other parts of the body, like the feet… Go to tutorial |
|
 |
Spine Setup This spine set-up will give you quite a bit of control by keeping things really simple. Go to tutorial |
|
 |
Elastic Foot using Expressions Cartoon animation looks great with some squash and stretch. To be able to ‘stretch’ bones you need a set-up that can handle ‘elasticity’ Go to tutorial |
|
|
Elastic Foot using Nodes This tutorial differs from the above one in that it’s built using nodes instead of expressions. Go to tutorial |
|
 |
Cartoony Eye This tutorial shows how to create a cartoon eye that is not spherical and can have any shape and size that you want. Go to tutorial |
|
| MEL SCRIPTS
|
||
 |
rig101 List Utilities This script will create a window listing the most significant Maya utility nodes, such as the condition, the multiplyDivide and the setRange. Download script |
|
 |
rig101 LocknHide This script will help you control the keyable and non-keyable attribues in your channel box as well as being able to lock and unlock them. Download script |
|
 |
rig101 Wire Controllers Creates wire controllers to use as manipulators Download script |
|
 |
rig101 Template Objects Templates or untemplates the objects selected Download script |
|
 |
rig101 Multiple Influence This simple script let’s you select multiple influence objects and add them to your smooth skin instead of doing them one by one. Download script |
|
| OTHER
|
||
| What to put on a Creature TD Reel Some DOs and DONTs on what to put on a creature TD reel. Go to document |
||
Freeze Transformations
Whenever applying dynamic simulations like rigid body dynamics to an object, you should freeze it’s transformations because simulations like these use transformation information. Select the object and go to modify>freeze transformations. Now go to edit>delete by type>history, with the object selected. This tip is not relevant when working with nCloth because nCloth does not use an objects transformations.
Restoring And Resetting Maya
Align A Model in Maya
Quadrangulate
Converts the existing polygon selection to quadrangles.
Mesh > Quadrangulate > 
The following are the options for the Quadrangulate feature
- Angle threshold
-
Use the slider or type a value to set the limit beyond which two triangles are merged or not (where the limit is defined by the angle between the face normals of adjacent triangles). If Angle Threshold is 0, only co-planar triangles are merged. The maximum angle is 180 degrees. A value of 180 degrees means that all possible pairs of adjacent triangles are converted into four-sided faces.
- Keep face group border
- Keep hard edges
- Keep texture border
- World space coordinates
Tip : I always turn off ALL of the ticked option boxes in the Quadrangulate option box. Works most of the time.
How to Set Up New Project
[youtube=http://www.youtube.com/watch?v=DId2zNbLMUk&fs=1&hl=en_US]
HOW TO SET UP PROJECTS
Set up New/Edit/Set Project by going up to
File –> Project –> New/Edit/Set

NEW PROJECT
1. Name: Name of your project
2. Location: Where the folder of the project will be stored
3. Click on Use Defaults. This will create all necessary folders within the project folder.
4. Click Accept.

PROJECT FOLDER
Within the Maya directory in MyDocuments, you’ll find the new project folder.
The two folders right now you should know are scenes and sourceimages.
scenes: maya files are stored here, of the scenes you are working with
sourceimages: textures that you will apply to your models

Mia_roundcorners Shader
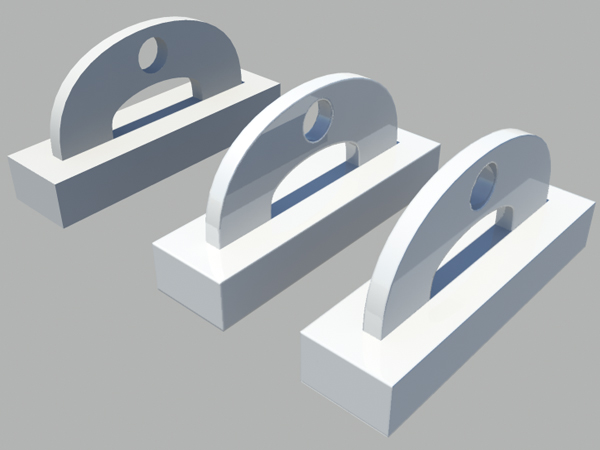
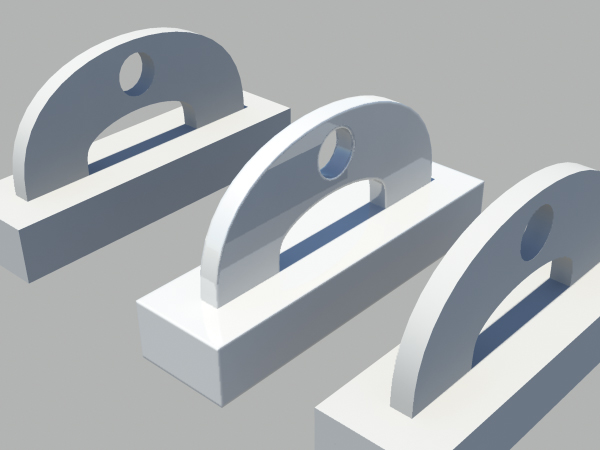
Final Product What You’ll Be Creating
In this tutorial, Ivan Krushkov walks us through how to use Maya’s mia_roundcorners shader to add a bevelled look to the edges of your model at render-time! Let’s take a look…
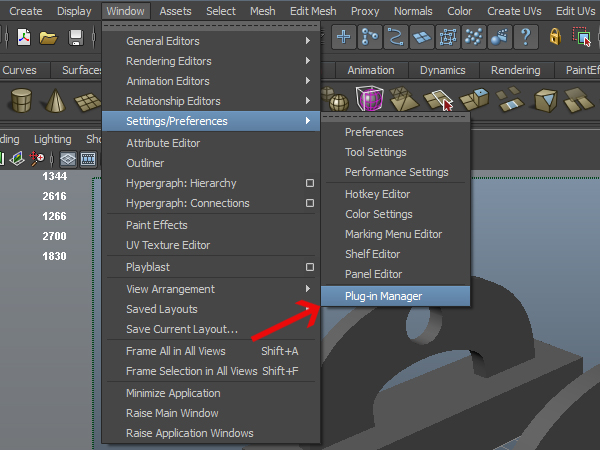
Step 1
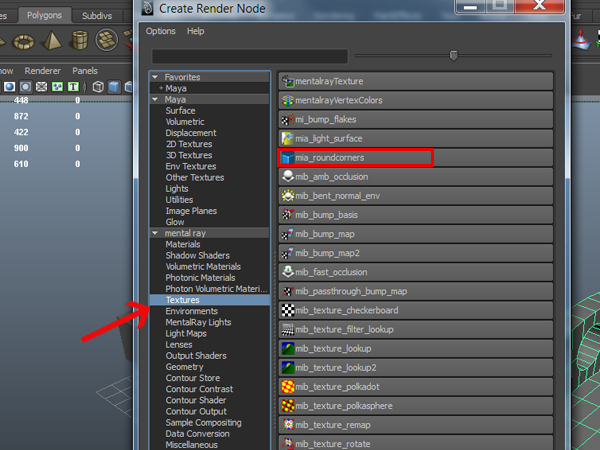
To start off, first we need to make shure that Mental Ray renderer is enabled inside of Maya because mia_roundcorners is Mental Ray texture. If youre using the scene file from this tutorial it will already be enabled for you, but if you are using your own scene make sure to turn it on by going to Window -> Settings/Preferences -> Plug-in Manager
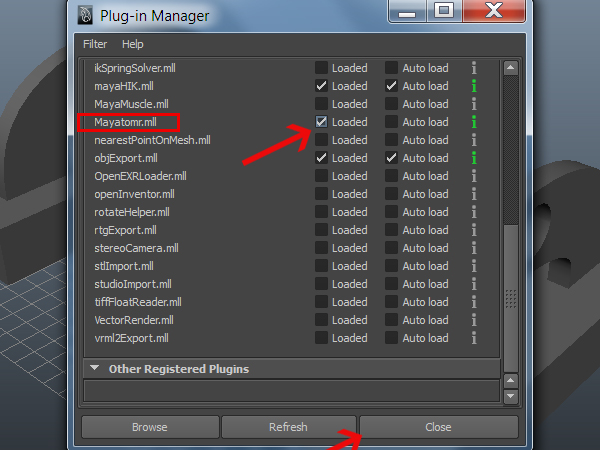
Step 2
Then scroll until you see Mayatomr.mll and check Loaded and then close the window
Step 3
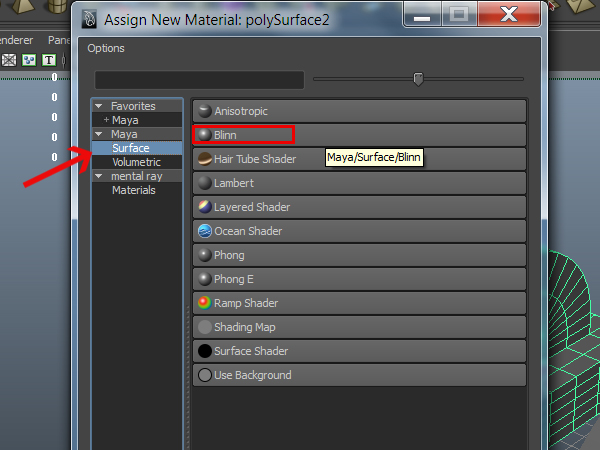
Now select the second object and hold right click on it and select Assign New Material

Step 4
Under the Maya section select Surface and then at the right select the Blinn material
Step 5
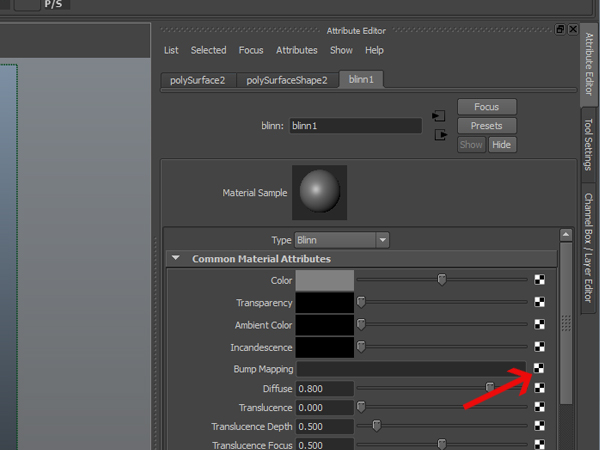
In the Attributes Editor of the material select the checkered button next to Bump Mapping
Step 6
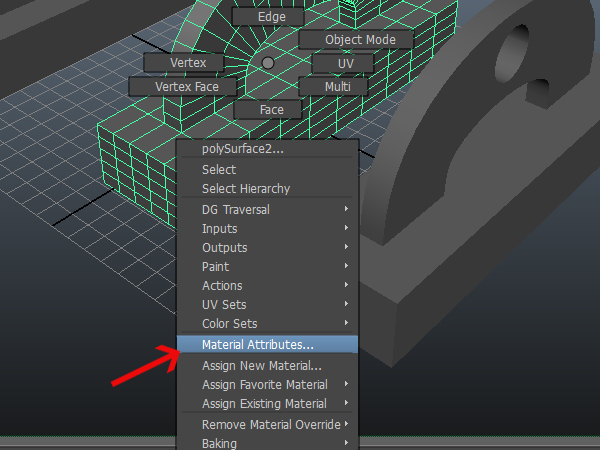
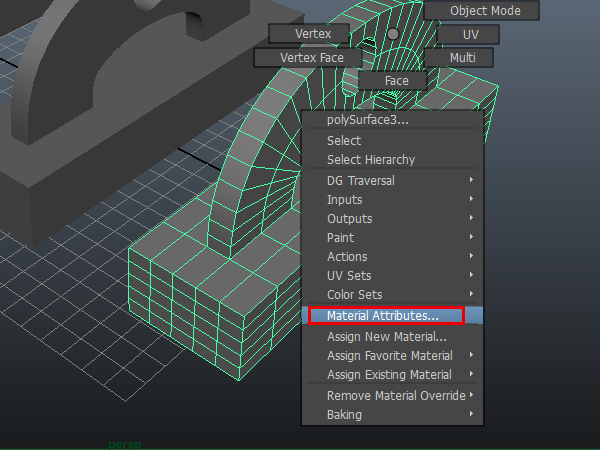
If for some reason you cant access the attributes for the material you can again right click and hold on the object and select Material Attributes
Step 7
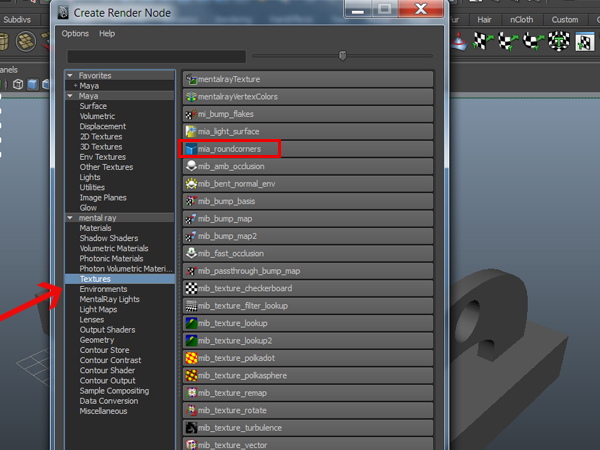
After clicking on the Bump Mapping button, in the window that comes up, under the mental ray section of shaders select the mia_roundcorners. This will place this texture shader in the bump slot of your material
Step 8
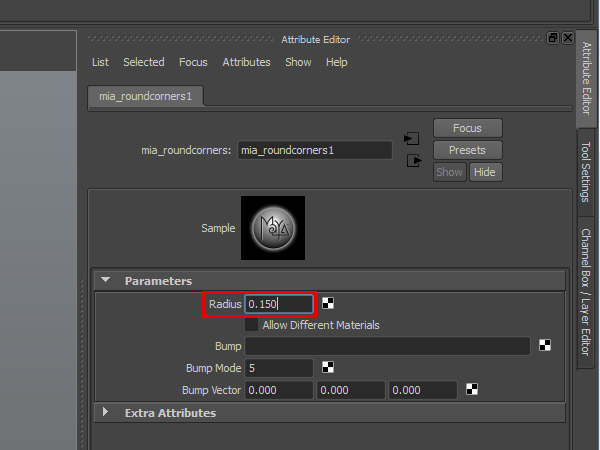
In the attributes for the mia_roundcorner you can start tweaking the Radius attribute which will determine how much the corners of your objects will be smoothed. And if you wish to add bump map to your material without removing the mia_roundcorner, inside the node you can place the bump inside the Bump slot of the mia_roundcorner
Step 9
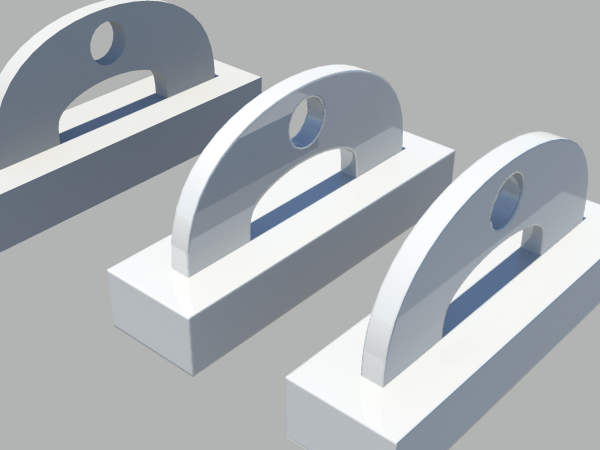
If you now took a render of the scene you can see how the middle object has all of its sharp edges rounded in contrast to the left one
Step 10
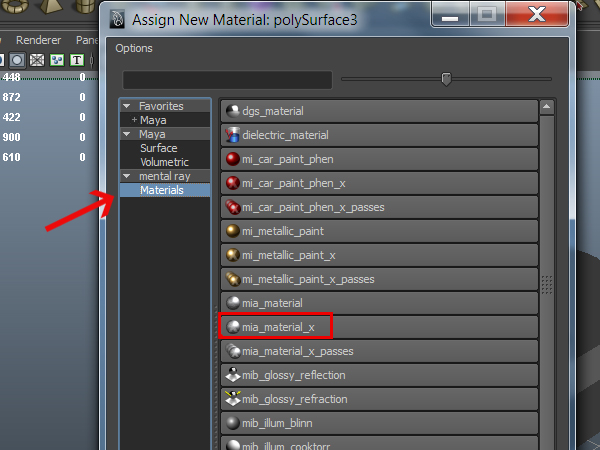
The workflow to assign a mental ray material with the roundcorner shader is a little bit different than the one with a maya material. Select the third object and again right click and hold and go to Assign New Material

Step 11
In the window that comes up under the mental ray section select the mia_material_x
Step 12
Again if you dont see the materials attributes you can right click on the object and select Material Attributes
Step 13
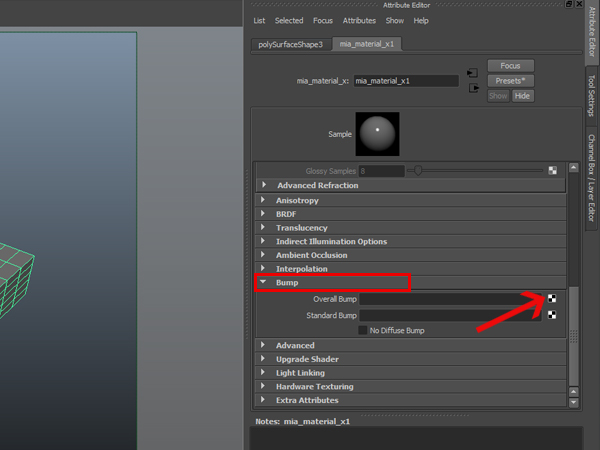
Under the attributes for the material scroll down to the Bump section and expand it. Then click on the checkered button next to Overall Bump
Step 14
Again in the window that comes up, under the mental ray section of shaders select the mia_roundcorners
Step 15
Now again we can tweak the radius to select the roundness of our edges. Lets put 0.150
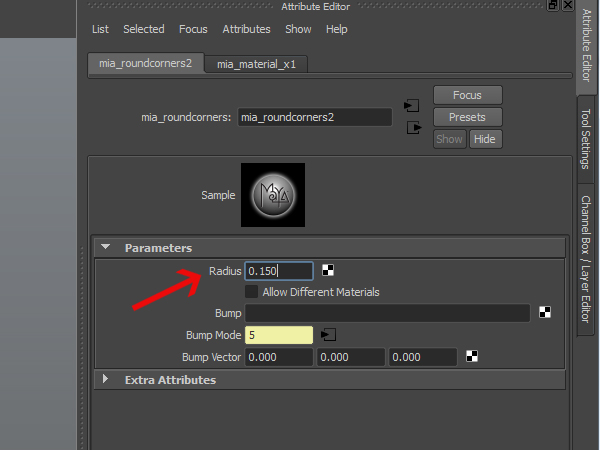
Step 16
If you want now you can place additional bump map in the Bump slot of the mia_roundcorners or in you material Standard Bump

Step 17
Heres the final result you can see the right most object is now with rounded edges and you can compare it against the one without the mia_roundcorners shader applied to it
Flocking
http://www.flash-fx.net/3D/tools/bFlocking/ bFlocking – A custom written tool to generate artifical intelligence flocking in Maya 8.5+ Ganz
Hypershade
http://3d-future.blogspot.com/2009/11/maya-tutorial-texturing-and-shading.html MAYA Tutorial – Texturing and Shading
Maya – Particles
http://www.respower.com/page_tutorial_maya_particle_caching
Rendering in Maya with Particles