Peter Baustaedter – Matte Painter

Spotlights – User Profile – Peter Baustaedter

“We did a total of 330 matte shots on Avatar and Vue was of great help to get them all done in the schedule.
Vue just delivers the best results with the least amount of pain!”

Peter Baustaedter, Weta Digital.

Please meet Peter Baustaedter, a Vue artist currently working for Weta Digital.

Peter entered the video production and advertising industry back in 1992. Since then, Peter has worked for high profile studios such as Digital Domain, Universal Studio, Electronic Arts, The Orphanage, and most currently Weta Digital!

Since he began his career, Peter’s work can be seen in many blockbusters such as “Apollo 13”, “Dante’s Peak”, “The Fifth Element”, “Titanic”, “Lord of The Rings: The Two Towers”, “King Kong”, “The Day After Tomorrow” or “The Lovely Bones” to name just a few.

Peter and the Weta Digital Matte Painiting team have recently finished over 330 shots on “Avatar“. For their work, his team received a VES award for Outstanding Matte Paintings in a Feature Motion Picture.

About Peter

E-on: Tell us a little about yourself?

Peter Baustaedter: Originally, I’m from Graz, Austria. Incidentally the same town that Arnold Schwarzenegger is from. I’m much less bulky tho. 😉

My first contact with computer graphics was when I got a Commodore 64 when I was 14 years old. After playing games became somewhat boring, I discovered that one could ‘paint’ on those machines. Albeit with 16 colors only and a joystick as input device but I was hooked.

I then moved on to an Amiga and that’s when I really dove into cg. I was part of the European “Demo Scene” and made three games too.

Parallel to that I went to art school and was educated in film, photography and video. Especially my extensive education in photography is helping me to this day.

Click to follow link
One of Peter’s personal paintings inspired by his work on Avatar. Based on a Vue render and a few photos. 

You have a long history with visual effects. Can you fill us in on some of the highlights of your career, some of the different areas of the industry you have worked in, and some of the studios you’ve worked for?

PB: I first started out in video post production in 1992 where I worked on an ancient Quantel Video Paintbox. From that I moved onto a Quantel Graphic Paintbox – a highres paint tool where I did image manipulations for advertising.

Early 1995 I moved to Los Angeles to work for Digital Domain. My first movie was Apollo 13. During my time at DD I also did my first matte paintings on Dante’s Peak, concepts for The Fifth Element and again matte paintings and color work for Titanic.

I also worked on my first stereo show – Terminator2/3D – a ride for Universal Studios.

In August 1997 I moved to Hawaii and for two years was part of the team that created “Final Fantasy – The Spirits Within”. I was a member of the art department and then matte painting supervisor.

I returned to LA in 1999 and mostly worked as a freelance matte artist during those days – worth a mention would be “Swordfish” and the pilot for “Firefly”.

Click to follow link
Personal painting. ©Peter Baustaedter. 

2002 was my first contact with Weta during 6 months of working as a matte and texture artist on “LOTR: The Two Towers”. I loved working on this movie. Just the things to paint I became a matte painter for.

Returning to Los Angeles once again I joined my old colleagues at DD to create visual effects for “The Day After Tomorrow”. I finished the show at the Orphanage in San Francisco. I painted the inside of the Hurricane amongst many other mattes.

After a quick for months at EA LA I returned to New Zealand to do mattes for King Kong and have stayed here at Weta ever since.

What lead you to using Vue? What spurred your interest in Vue and when did you become involved in it?

PB:I read about Vue on the internet and saw different testimonials on various forums. So I bought myself a license and was amazed what I could do with it. I especially liked the eco systems and the atmospheric engine. I just love the way Vue is lighting scenes and like how it puts technicalities in the background, so one can concentrate on the artistic side of things.

How long have you been using Vue?

PB: I’ve been using Vue for about four years now. For my professional work about the same time. The first time I used it for a movie was for “30 Days of Night” where I rendered some pack ice.

Click to follow link
Vue environments in “30 Days of Night”. Photo courtesy of Weta Digital.
© 2007 Columbia Pictures Industries, Inc. All Rights Reserved
 

As an artist, how does CG art fit into your work? What is its role?

PB: I only do CG so hmm – it fits very well 😉

You seem to have carved a very interesting path through the industry working on a hefty number of blockbusters. What has been the most important skill for you as an artist?

PB: Having a good eye combined with a solid understanding of the tools you are using is essential. We’re deployed to produce beautiful imagery – so to know how to get there and to know when you’ve arrived are in my opinion the most important skills.

Click to follow link
Vue environments in “Avatar”. Photo courtesy of Weta Digital.
© 2009 Twentieth Century Fox Film Corporation. All rights reserved
 

How does Vue, in general, contribute to your artwork?

PB: I use Vue to get a painting laid out and to get a good solid base to work from. I try to establish the lighting for the scene, which I can build upon when completing the painting.

I work a lot with photographic elements – but sometimes it’s impossible to shoot or obtain reference. An old favorite are tree-scapes shot top-down, in special lighting conditions. Or currently I’m working on a desert panoramic view from helicopter altitude.

Before, one had to look for the right photos, never finding the perfect one, and then go about desperately stitching, color correcting and composing those together. Vue is great to put into action for all those cases and is keeping the perspective and lighting flexible. Layered rendering is a god send too – it makes the render much easier to integrate and to manipulate.

I also used Vue to render unwrapped sky domes and would ‘sweeten’ them with photographic elements. I’ve just been upgrading from version 7.5 to 8.5 and can’t wait to put the Spectral 3 clouds to work. I think I’ll be able to create sky domes that will hold up on screen without much tweaking. Very exciting!

The new terrain generator looks very cool too – I hope I get some time to really dive in and explore all the new features.

Click to follow link
Click to see more Lovely Bones
work by Weta Digital
 

The list of movies you’ve worked on is pretty impressive, could you name some of the projects you’ve used Vue on?

PB: I’ve used Vue on a number of projects – schedule and nature of the work make it impossible to use Vue all the time but here we go:

  • “30 Days of Night” – Christian Haley and me used Vue to render pack ice and Christian also used the render as the basis for his sky if I remember correctly.
  • “The Lovely Bones” – did some layouts with it on this project.
  • “Avatar” – Brenton Cottman spearheaded the effort and came up with a pretty neat pipeline on this one. We did a total of 330 matte shots on Avatar and Vue was of great help to get them all done in the schedule.
  • Vue came into play especially when doing jungle vistas and floating islands, all enveloped in Vue’s excellent atmosphere.

    Recently, three colleagues and I received the VES award for“Outstanding Matte Paintings in a Feature Motion Picture”for Avatar.

    Check out Weta’s website for more information and sample videos of their work on Avatar >>

    Click to follow link
    Vue environments in “Avatar”. Photo courtesy of Weta Digital.
    © 2009 Twentieth Century Fox Film Corporation. All rights reserved
     

    You work for Weta right now. Can you tell us a little about what your day contains?

    PB: My day usually starts with a strong cup of coffee. After that it’s checking if last night’s renders came out ok and submitting them for dailies. After going to dailies and getting feedback for my submission, it’s off to do the actual work. It usually involves looking for reference (or going out and shooting some if appropriate), using Maya, Vue and Nuke and of course Photoshop. Throw in meetings with our coordinator and supervisors and the day is over quickly.

    About Vue

    Where does Vue fit into this? Tell us a bit about your pipeline.

    PB: Usually a shot starts with layout geo that we receive from our layout department. I prep it for my needs and generate a projection camera. That geo and camera are sent over to Vue, where the lighting layout is done and where eco systems are deployed.

    After rendering some layers, I put it all together in Photoshop and do my work there. Once there is something to see, I’ll take those layers into nuke and do my projections there. Voila! (if only it was that easy!)

    Click to follow link
    Personal painting. ©Peter Baustaedter.

    What was the most powerful part of using Vue in your workflow for both visual development and production work?

    PB: Ecosystems, lighting and atmosphere.

    What do you consider to be the most fundamental difference between Vue and traditional 3d programs?

    PB: I like the “all in one” approach that allows to get good results without having to dig through pages and pages of menus.

    What is your favorite new feature or features of Vue?

    PB:Ecosystems, lighting and atmosphere. 😉

    Click to follow link
    Personal painting. ©Peter Baustaedter. 

    How do you train yourself to Vue (and do you need training?) And what would you like to learn next?

    PB: It’s mostly learning by doing or learning from colleagues. My knowledge of Vue has severe gaps since I usually am so busy that I don’t have much time to explore as much as I would like to.

    I’d just like to expand my general knowledge to greater depths.

    Would you recommend Vue to other artists, and why?

    PB: I do recommend it quite often to fellow matte painters / environment artists because of reasons stated above.

    Click to follow link
    Personal painting. ©Peter Baustaedter. 

    Any other comments about Vue you would like to share with us?

    PB: I’ve tried other environment design packages but for what I am looking for, Vue just delivers the best results with the least amount of pain.

    For more information, follow Peter’s Blog at http://fillingthedrywell.blogspot.com/. Also make sure to check Peter’s credits on IMDB.

    Click to follow link
    Personal painting. ©Peter Baustaedter. 

    Eight Seemingly Sinister Goliaths of the Insect World

    1. THE GIANT HISSING COCKROACH

    The things that make most humans shudder with distaste are insects, of many varieties, and the bigger they are, the more we instinctively fear them. Yet for all the species and types that we know about, something in the order of a million different creatures, biologists are certain that anything up to ten million more are yet to be discovered, a statistic that will get some people itching.

    Though the number of nasty species of insects is actually relatively small, in percentage terms, there are some monsters among them that look as fearsome as they possibly could, without necessarily being harmful. Some, indeed, are in fact extremely palatable for some creatures, and  bred as food for reptiles, like the South American Dubia cockroach.

    Of course, the cockroach is the one creature that makes the skin really crawl, for any person affected by them, and with species varieties named ‘Devil’s Apprentice’ or ‘Death Head’, it is small wonder, yet less than one percent of these species affect humans at all. The most distressing, possibly, is the aptly named Giant Hissing cockroach, in terms of the size it can reach, but these wingless, odourless, non-biting creatures are actually kept as pets by some people, and pose no threat to humans at all.

    2. THE GIANT WETA

    Though not the least bit harmful to any human, the Giant Weta truly is a bug that will make you step back, should you meet one. At four inches long, and heavy, for an insect, this gentle giant of the insect world does not bite, or jump, preferring to use its fearsome appearance to ward off danger. Native to Australia, South America and south Africa, the  Maori people call the Weta , the ‘god of ugly things’, a name it certainly lives up to.

    3. THE TITAN BEETLE

    Another creature that really does look far more terrifying than it actually is the Titan Beetle, of the Amazon rain forest.  The largest specimen ever measured was an amazing nine inches in length, but these massive monsters, once again, are not dangerous to humans, as threatening as they may appear to be, should you ever happen upon one. The strong mandibles could give a sharp nip, but it would be unusual for that to happen.

    4. THE JERUSALEM CRICKET/ POTATO BUG

    The creature that many Americans especially seem wary of is the Jerusalem Cricket, better known as the Potato bug. Found along the Pacific coasts of both Mexico and the USA, this hated creature has a reputation it hardly deserves. This insect feeds on dead organic matter, both plant and insect, and has strong mandibles. That could inflict a painful bite. Wrongly presumed to be poisonous, they cannot, as rumored, rub hind legs together to create sounds, though a terrible stench can be manufactured by them, as a defense mechanism.

    5. THE St, HELENA GIANT EARWIG

    Yet another creature that every person on earth automatically shies away from is the Earwig, prompted by the fear that another myth might be true, and the insect might be attracted tio their ear-canal!  Not that this example could get into anything but the largest animal ear, but the St Helena Giant Earwig, over three inches in length, has never been seen alive since 1967, and is believed to be extinct. Still, how might you feel if one of these was crawling up your arm?

    6. THE BLACK FOAM GRASSHOPPER

    Not perhaps appearing to be too threatening, the South African Foam Grasshoppers have a self-protection mechanism that involves thier jetting out a stream of stinking foam, in the direction of any danger, when they feel threatened, and some varieties, like the Milkweed Grasshopper, even send out toxic foam, made so by their diet. The area affected by these nasty emissions cab as much as a meter in diameter, and woulkd make for a very unpleasant experience.

    The foam grasshopper (Dictyophorus spumans) can be found in southern Africa and their trademark is protecting themselves by secreting a stinking foam when threatened. Ken Preston-Mafham writes in the “Encyclopedia of Land Invertebrate Behaviour” (MIT Press, 1993) about a personal observation of the charming little critter: “[It] produces… such a nauseating stench that it surrounds the grasshopper in a protective chemical umbrella extending up to 1 m all around it.” Lovely.

    7. THE CARNIVOROUS GIANT CENTIPIDE

    One creature that we never quite know whether to love or hate is the Centipede, but the chances are that this particular variety will fall into the latter category. The largest terrestrial invertebrate on earth, as long as twelve inches, this frighteningly huge creature is carnivorous, feeding not only on Tarantula spiders, but also on birds, mice, bats and frogs, with potent venom, that  is toxic even to humans, for whom painful bites from this carnivorous monster can cause swelling, and fever, though never fatal

    Of course, one could hardly compile such a list without including the Goliath bird-eating spider, considered very aggressive and able to make hissing noises, to frighten off intruders, as well as rearing up on hind legs, in threat positions. Two fangs have poison glands , and though not very toxic to humans, the venom  can cause nausea, sweating and severe discomfort. These monsters are often twelve inches across, and certainly not approachable by humans.

    These are gust some of the amazing monrters of the insect world, often given reputations they don not deserve, and inspiring fear that is mostly unjustified, but these fears go back to the earliest stages of evolution, when survival depended upon them, so this hard wiring, in the human brain, is never likely to let us stop being afraid, and perhaps that is just as well.

    8.THE GOLIATH BIRD-EATING SPIDER

    Freeze Transformations

    Whenever applying dynamic simulations like rigid body dynamics to an object, you should freeze it’s transformations because simulations like these use transformation information. Select the object and go to modify>freeze transformations. Now go to edit>delete by type>history, with the object selected. This tip is not relevant when working with nCloth because nCloth does not use an objects transformations.

    Quadrangulate

    Converts the existing polygon selection to quadrangles.
    Mesh > Quadrangulate >  

    The following are the options for the Quadrangulate feature

    Angle threshold

    Use the slider or type a value to set the limit beyond which two triangles are merged or not (where the limit is defined by the angle between the face normals of adjacent triangles). If Angle Threshold is 0, only co-planar triangles are merged. The maximum angle is 180 degrees. A value of 180 degrees means that all possible pairs of adjacent triangles are converted into four-sided faces.


    Keep face group border

    Maintains the borders of face sets. When turned off, the borders of face sets can be modified. The default setting is on.


    Keep hard edges

    Maintains hard edges. If turned off, hard edges can be deleted between two triangles. The default setting is on.


    Keep texture border

    Maintains the borders of texture maps. When turned off, the borders of texture maps can be modified. The default setting is on.


    World space coordinates

    When turned on (default), the specified Angle Threshold value is the angle between the face normals of adjacent triangles in world space. When turned off, the Angle Threshold value is the angle between the face normals of adjacent triangles in local space.


    Tip : I always turn off ALL of the ticked option boxes in the Quadrangulate option box. Works most of the time.

    How to Set Up New Project

    [youtube=http://www.youtube.com/watch?v=DId2zNbLMUk&fs=1&hl=en_US]


    HOW TO SET UP PROJECTS

    Set up New/Edit/Set Project by going up to

    File –> Project –> New/Edit/Set

    Maya Beginner Basics


    NEW PROJECT

    1. Name: Name of your project

    2. Location: Where the folder of the project will be stored

    3. Click on Use Defaults. This will create all necessary folders within the project folder.

    4. Click Accept.

    Maya Beginner Basics


    PROJECT FOLDER

    Within the Maya directory in MyDocuments, you’ll find the new project folder.

    The two folders right now you should know are scenes and sourceimages.

    scenes: maya files are stored here, of the scenes you are working with

    sourceimages: textures that you will apply to your models

    Maya Beginner Basics


    Mia_roundcorners Shader

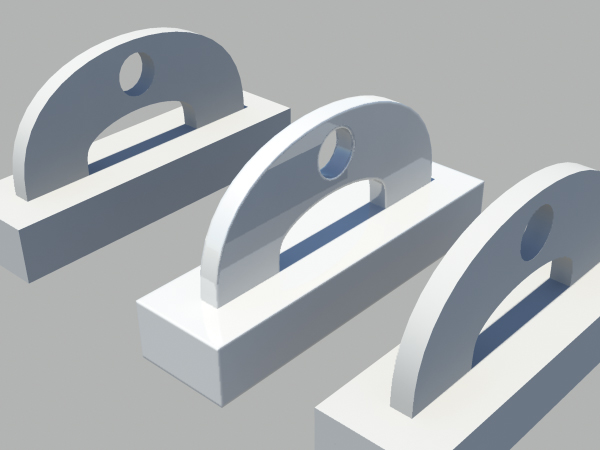
    Final Product What You’ll Be Creating

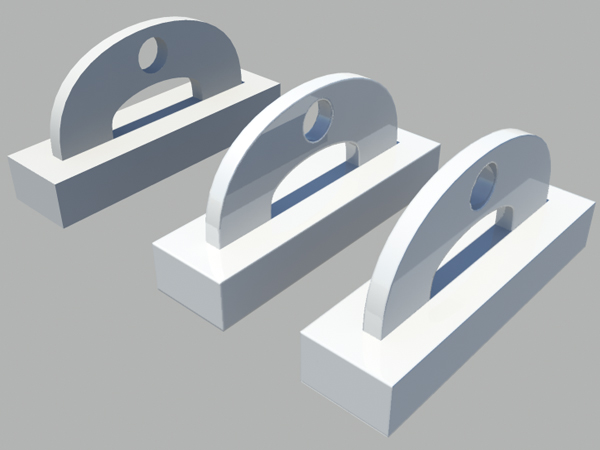
    In this tutorial, Ivan Krushkov walks us through how to use Maya’s mia_roundcorners shader to add a bevelled look to the edges of your model at render-time! Let’s take a look…

    Step 1

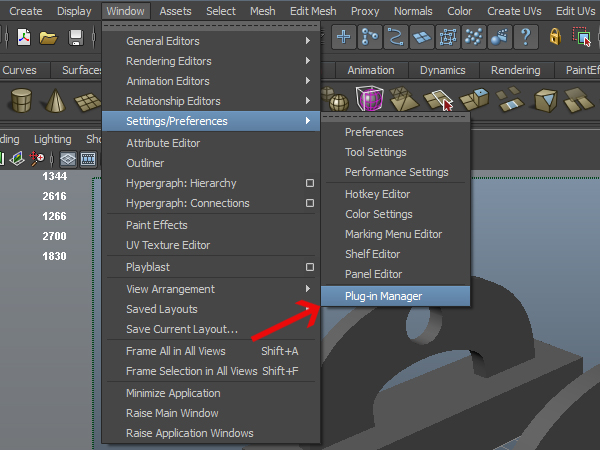
    To start off, first we need to make shure that Mental Ray renderer is enabled inside of Maya because mia_roundcorners is Mental Ray texture. If you’re using the scene file from this tutorial it will already be enabled for you, but if you are using your own scene make sure to turn it on by going to ‘Window -> Settings/Preferences -> Plug-in Manager


    Step 2

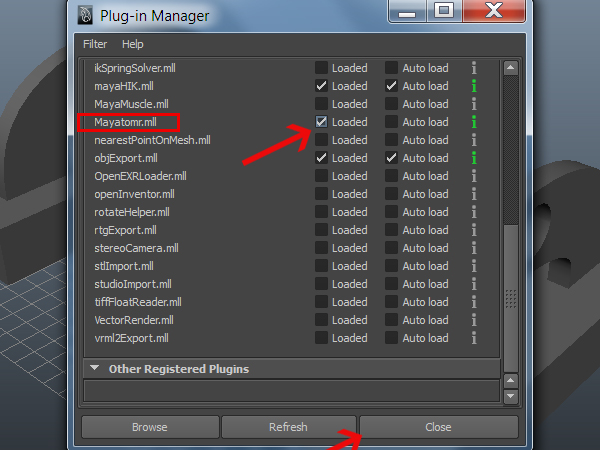
    Then scroll until you see ‘Mayatomr.mll’ and check ‘Loaded’ and then close the window


    Step 3

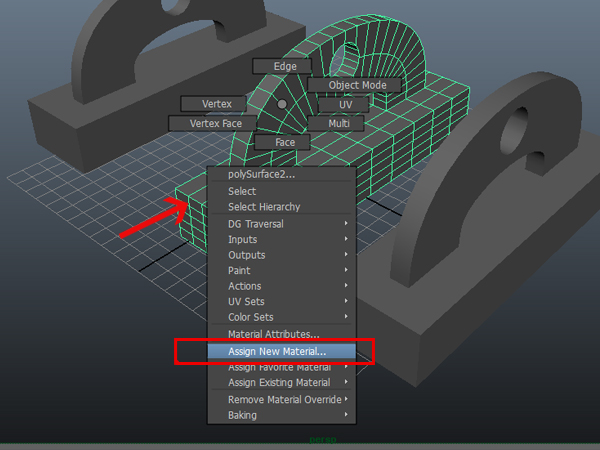
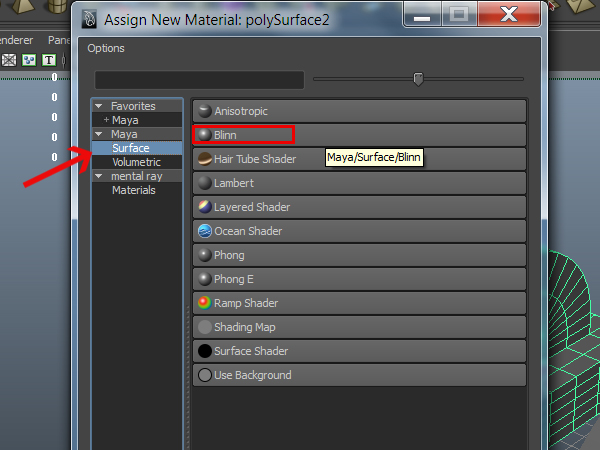
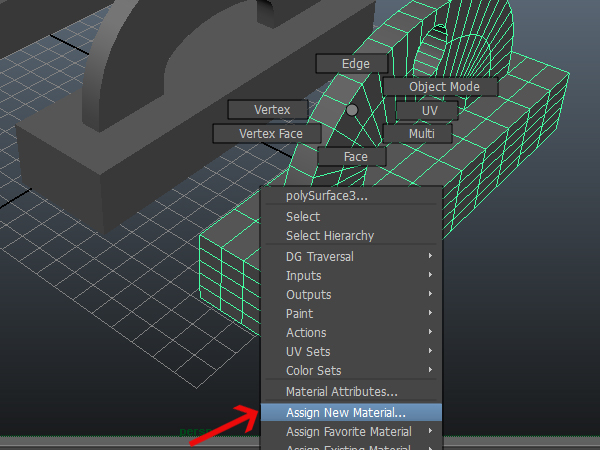
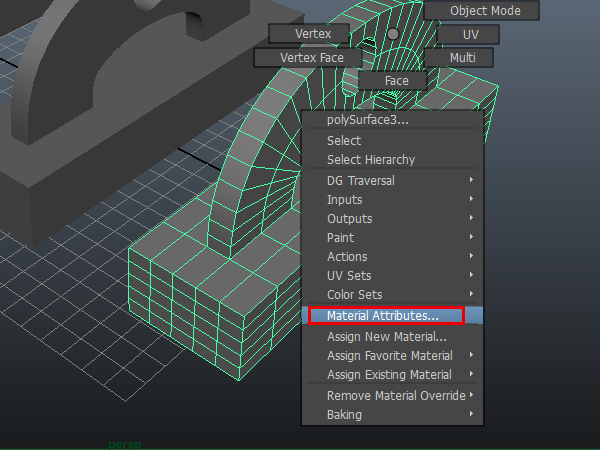
    Now select the second object and hold right click on it and select ‘Assign New Material…’


    Step 4

    Under the Maya section select ‘Surface’ and then at the right select the ‘Blinn’ material


    Step 5

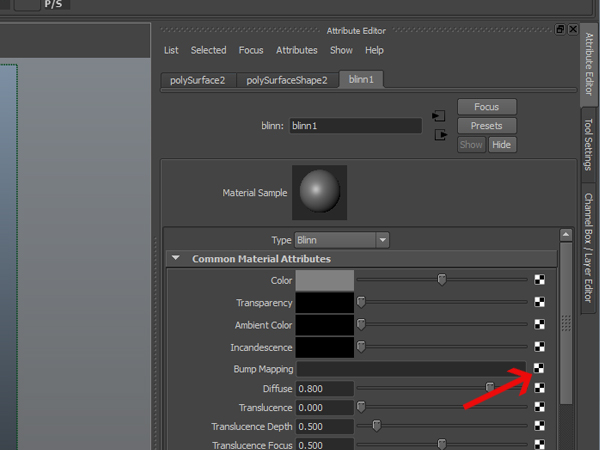
    In the Attributes Editor of the material select the checkered button next to ‘Bump Mapping’


    Step 6

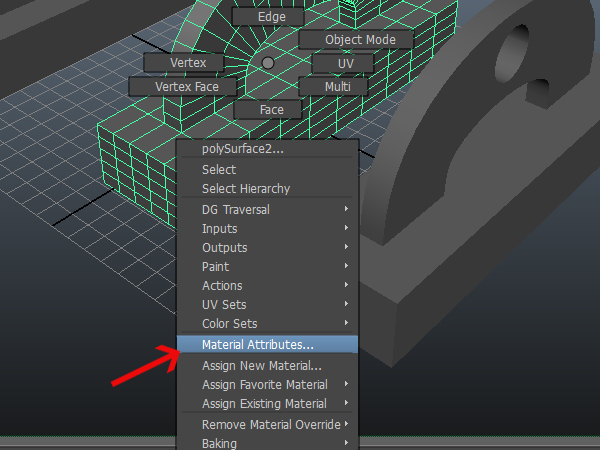
    If for some reason you can’t access the attributes for the material you can again right click and hold on the object and select ‘Material Attributes’


    Step 7

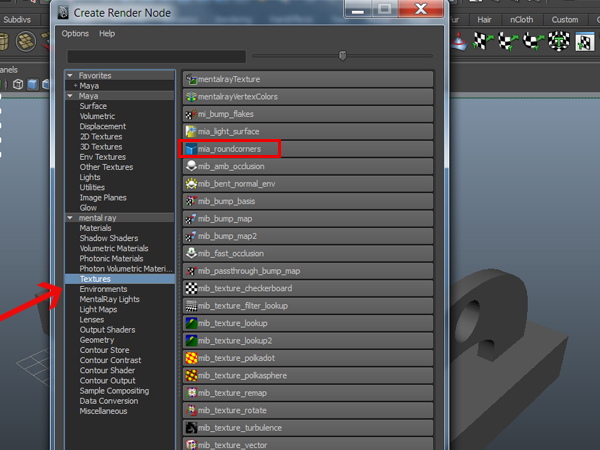
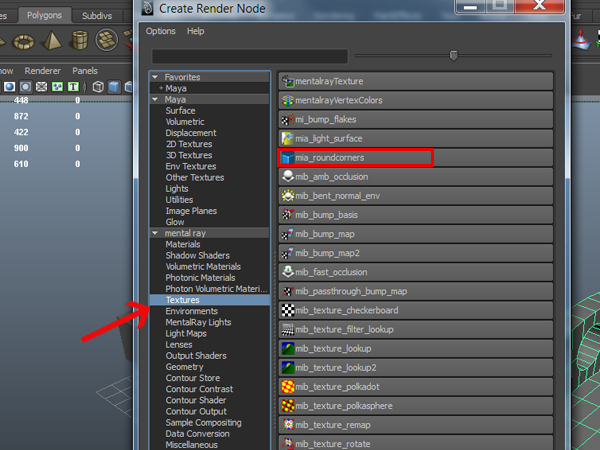
    After clicking on the ‘Bump Mapping’ button, in the window that comes up, under the mental ray section of shaders select the mia_roundcorners. This will place this texture shader in the bump slot of your material


    Step 8

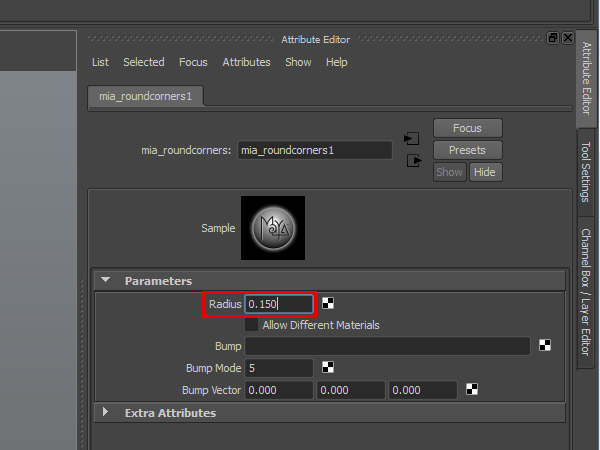
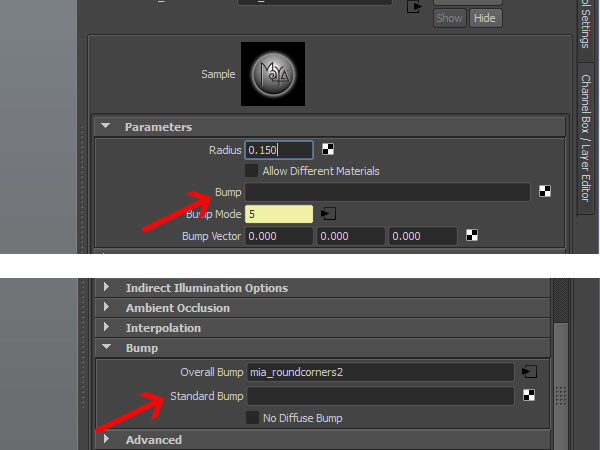
    In the attributes for the mia_roundcorner you can start tweaking the ‘Radius’ attribute which will determine how much the corners of your objects will be smoothed. And if you wish to add bump map to your material without removing the mia_roundcorner, inside the node you can place the bump inside the ‘Bump’ slot of the mia_roundcorner


    Step 9

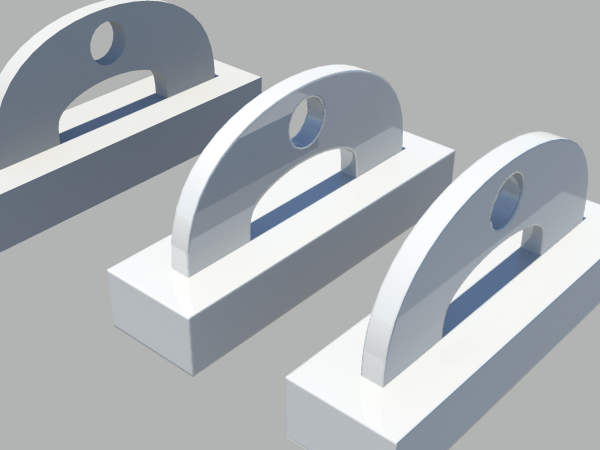
    If you now took a render of the scene you can see how the middle object has all of its sharp edges rounded in contrast to the left one


    Step 10

    The workflow to assign a mental ray material with the roundcorner shader is a little bit different than the one with a maya material. Select the third object and again right click and hold and go to ‘Assign New Material…’


    Step 11

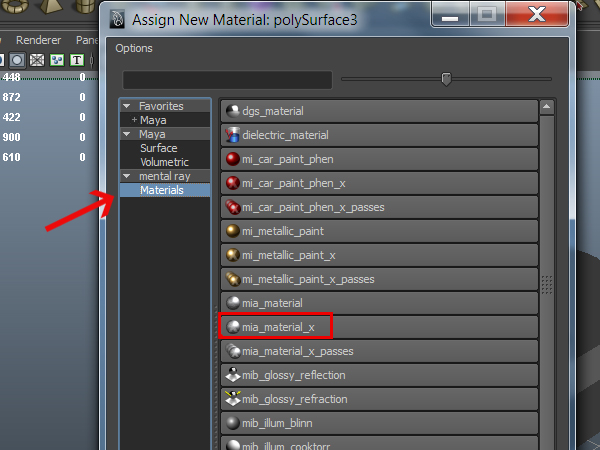
    In the window that comes up under the mental ray section select the mia_material_x


    Step 12

    Again if you don’t see the material’s attributes you can right click on the object and select ‘Material Attributes…’


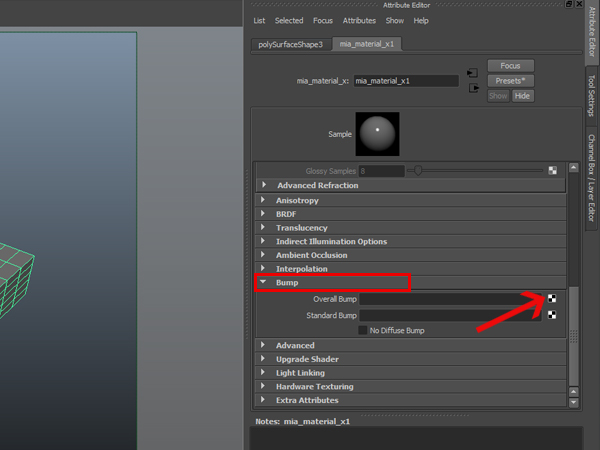
    Step 13

    Under the attributes for the material scroll down to the ‘Bump’ section and expand it. Then click on the checkered button next to ‘Overall Bump’


    Step 14

    Again in the window that comes up, under the mental ray section of shaders select the mia_roundcorners


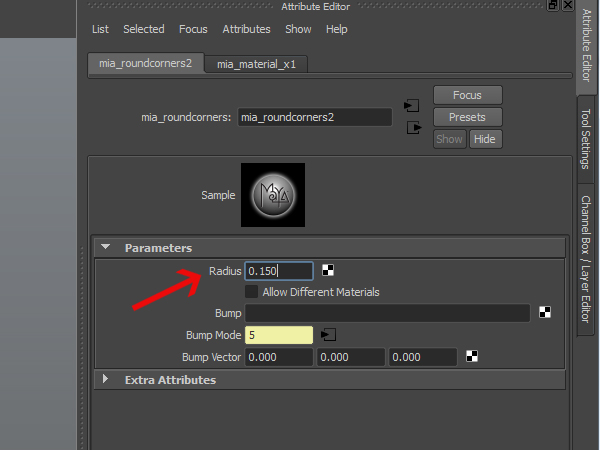
    Step 15

    Now again we can tweak the radius to select the roundness of our edges. Let’s put ‘0.150’


    Step 16

    If you want now you can place additional bump map in the ‘Bump’ slot of the mia_roundcorners or in you material ‘Standard Bump’


    Step 17

    Here’s the final result you can see the right most object is now with rounded edges and you can compare it against the one without the mia_roundcorners shader applied to it


    Baking Textures – xNormal

    http://www.xnormal.net

    What is xNormal?

    A: xNormal is an application to generate normal / ambient occlusion / displacement maps. It can also project the texture of the highpoly model into the lowpoly mesh ( complete texture transfer, even with different topologies ).

    Includes too an interactive 3D viewer with multiple mesh and textures format support, shaders and realtime soft shadows / glow effect.

    It comes with some useful tools like height map – normal map – cavity map – occlusion – tangent/object space and spherical harmonics tools.

    All these computations are done using multicore/multithreading, distributed/parallel rendering, ray tracing and advanced GPGPU techniques.

    Q: How much xNormal costs?

    A: Absolutely nothing. It’s free for any use, including commercial one. No price and no fees at all.

    A VFX Knowledge Repository