Tag Archives: Making of
Making of Warhammer: The End Times – Vermintide
The VFX of Guardians of the Galaxy

Strong characters, immersive environments and a ripping 80s soundtrack – that’s Marvel’s latest film Guardians of the Galaxy in a nutshell. With two main characters that would be realized entirely in CG, and with vast space and earth-like environments to create, the visual effects crew were once again crucial to completing the film. Overall visual effects supervisor Stephane Ceretti, associate visual effects supervisor Olivier Dumont and visual effects producer Susan Pickett guided the ship. They lead a vast army of VFX artists from 13 companies including MPC, Framestore, Luma Pictures, Method Studios, Imageworks and an in-house unit, plus previs/postvis teams from Proof and The Third Floor. fxguide takes a look at just some of the major sequences.
Making of Assassin’s Creed Unity New engine
“Metro” by Main Road Post
ILM‘s Rango Rides Into the Wild West With Help From NVIDIA Quadro
http://www.animationxpress.com/index.php?file=story&id=36181
In Rango, the new Paramount Pictures and Nickelodeon animated film directed by Gore Verbinski, visual effects facility Industrial Light & Magic (ILM) was able to overcome production demands and timeline challenges with the help of NVIDIA Quadro (www.nvidia.com/quadro) professional graphics solutions.
Approximately 450 ILM artists located in San Francisco and Singapore worked on Rango, each on a workstation equipped with NVIDIA Quadro solutions. The artists benefited from the speed of the graphics processing unit (GPU) when using animation tools such as Autodesk Maya, along with a range of ILM‘s in-house applications.
"Whenever you‘re approaching a film of this scale you need to make your productionpipeline operate as efficiently as possible-especially when it comes to character animation work," said Tim Alexander, VFX supervisor for Rango. "By using NVIDIA Quadro processors and building GPU-accelerated processes into our workflow, we saved a huge amount of rendering time."
ILM‘s proprietary GPU-accelerated fluid solver/renderer "Plume" has been used on several films, including Harry Potter and the Half-Blood Prince and The Last Airbender. For Rango, new shadow and lighting features were built into Plume to make dust and fire simulations more realistic, contributing to the unique look of the environments envisioned for the film.
Plume was also used to simulate fire; in one scene, the main character Rango belches flames, setting a saloon patron ablaze. "With NVIDIA GPU acceleration in Plume, we‘re getting real-time feedback on dust and fire. Previously it would have taken one or two days to simulate the same scene," continued Alexander.Alexander explains, "If we have a character standing in the key light, he‘ll actually cast a shadow into the dust, smoke or fire. In the past we would fake those biometric ray-type effects or any sort of shading in the composite phase. By using the GPU to bake shadows and lighting into the simulation, we saved a tremendous amount of time and achieved a more realistic effect by having all of the detail of the object that‘s casting the shadow actually in the shadow itself."
Rango‘s crowd scenes feature up to 120 variations of 75 key characters—each one with either hair, fur or feathers on their body. In order to accommodate the massive amounts of rendering required to generate the frames, ILM developed a GPU-accelerated process to calculate lighting occlusion. The occlusion data provided a preview of hair or feathers, and was fed into Pixar‘s RenderMan renderer for a final pass. The pipeline shortcut resulted in speed increases of up to 100 times, depending on how complicated the hair or feathers were within a given sequence.
Furthermore, the hundreds of GPU cores in each artist‘s workstation also boosted the performance of ILM‘s GPU render farm during off-business hours. With "ObaQ," ILM‘s Academy Award-winning render queue system, NVIDIA processors were automatically utilized by the render system when an artist logged out at the end of the workday.
"Our ongoing work with ILM to drive GPU optimization for visual effects and CG creation has led to incredible results," saidDominick Spina, technology manager, Digital Film Group, NVIDIA. "ILM‘s growing GPU integration and the dramatic impact it has made on their workflow ultimately benefits filmgoers, who continue to be delighted by ILM‘s innovative visual effects."
The first fully animated feature film by ILM, Rango was released in theaters on March 4, 2011 and rocketed to the top box office spot in its opening weekend. In addition to the host of GPU-accelerated tools ILM developed to meet the demands of this film, they‘re currently developing new GPU-based toolsets in their upcoming productions.
Guinness – World AD – Bring it to life
Dogboarding
Earthrise
Black Swan
Douglas Trumbull
MPC – Sky
http://www.cgnews.com/2011/02/mpc-and-sky-creative-aim-for-the-skyline-for-sky/
MPC has joined forces with Sky Creative to create a stunning stereo campaign to promote their film channel. Directed by Esther Wallace and Nick Tarte and produced by Sharon Kersley, the spot travels through different genres, unveiling epic stereo landscapes.
‘It is about escapism (explain the directors). This is our invitation to our audience to enter another world. We wanted to create a 360 pan around massive, epic landscapes populated by movie iconography. The journey takes us through a range of emotions – in a similar way that a movie would do. It’s a peek into movie moments.’
MPC was involved from an early stage, developing the Directors' vision with mood frames to create the right feel for each of the scenes. The five main genres were represented by different landscapes; desert for western, space for sci fi, city for romantic comedy, country for period drama and ice for family.
To unveil each of the genres, a 360 degree camera move was chosen, passing through the different landscapes. MPC was responsible for creating fully CG environments and rebuilding live action shots, all in stereo.
‘This was a job that required very specific timings and planning from 3D previz – explains 3D Supervisor Duncan McWilliam – If we could prove all the permutations worked in a previz accurate to real world scale scenarios then we knew the shoot would work…..give or take! We spent plenty of time here checking and double-checking, it felt like a NASA project. So when we turned up on set and it all worked and cut together just right the sense of satisfaction was great.’

A stereo camera on a circular dolly track was used to capture the live action footage on each of the locations. One of the main challenges was keeping the images sharp while moving the camera at a high speed. To achieve this, the footage was slowed to half the speed and later interlaced to avoid strobing.
Sourcing paired lenses and calibration after every transit was essential as the alignment had to be so accurate. McWilliam comments ‘If there’s once really big thing I’ve learned from the stereo VFX supervision, it’s make sure you take a LIDAR scan of every location. The old ways of running around measuring the set no longer cut it and to track stereo back at the post house is bloody tricky without know dimensions of nearly everything.’
2D Supervisor Matthew Unwin explains; ‘Tracking all the scenes in stereo with a 20 second shot plus transition duration was proving challenging. Creative briefs were constantly being updated so the team settled to develop the matte paintings and assets for the cg scenes. Now with real plates we were able to update our previs edit and solve the transitional issues.
The scale of each scene was the same physically but the creative scale needed to be different. The brief was to have an epic scale but in scenes such as space-scape the scenes looked flat in stereo. An impressive epic painting in the distance was all very well but in stereo it required foreground elements. We had spaceships but added swirling motion trails and then a foreground canyon edge with interactive dust to solve the problem.’

Stereographer Chris Vincze explains; ‘As the stereographer on the project my job was to create a 3D stereoscopic environment that matched the directors’ vision, giving the landscapes an epic quality that matched the movie references. The challenge was to strike a balance between having enough depth in the scene to make the 3D interesting, while keeping the scale feeling right. I wanted it to feel like looking out of a window at a real landscape. The challenge was to maintain consistency of depth throughout five different landscapes which were shot in different locations and make it feel like one changing landscape, so I worked extensively with the previs team to set an interaxial distance (the distance between the two cameras) that would work over all the landscapes.’
During the shoot, Chris Vincze worked with the camera rig tech to ensure the minimal amount of rig alignment errors and make sure that everything in the scene fit into the ‘depth budget’ defined by our stereo camera set-up, so everything would be comfortable to watch in the final film.
After the shoot, the plates had to be corrected to balance out any remaining camera rig alignment errors, and any differences between the two lenses. They also had to be colour corrected to account for the difference caused by the mirrored 3d rig.
This process was done in the Foundry’s Ocula plug-in. Keeping the right scale meant that almost everything was set behind the screen, so to enhance the 3d effect MPC worked with the directors and cg teams to add in additional foreground elements.
For example the light trails on the spaceships, dust clouds, butterflies and pigeons were all added in to balance the ‘depth budget’ and make the scene more interesting in 3D. This was especially important in scenes such as the spacescape where the buildings in the city were huge and distant, so you wouldn’t see any parallax difference or real depth in reality.

THE LANDSCAPES
The country landscape
The country scene was the first to be shot at the gardens of Blenheim Palace in England. Real conifers and bushes were placed to enhance the real transition and cast practical shadows over the picnicing family in a period drama scene. The landscape and lake was to be replaced.
Having found a city location which was to precede the country scene, the challenge was to find a New York street with specific criteria. Most of the dramatic locations have high towering buildings either side, which meant most of the action would be in shadow and not open to the countryside.
A location was found with 1 storey buildings to one side. The shot would need to be flipped with all signage corrected. MPC setup a 3d previz of the shot using google maps for reference. Once signed off the tech rec was done with precise stills and measurements which was integrated into the evolving edit. The team headed to New York with the limitations of height due to mayors office restrictions. A specific tilt angle had been set and this was now slightly compromised. The choreography of the street we had about an hour to shoot with the correct light due to flaring and loss of long shadows for the noisier romantic feel of the genre.
The City
The cityscape was a real challenge due to the height regulation issue which we knew would come back to haunt us. The transition to countryscape looked like the street was below the level of the lake so we needed to provide a solution. In Nuke, all the buildings were projected around the street and the first two transitional shot structures. We were able to cheat the perspective and lower the buildings then create a European cafe lakeside scene with jetty. The lake was actually raised slightly to blend at the correct level. In mono this is all relatively straighforward but in stereo all had to be checked constantly. However, recreating the entire scene enabled the creatives to develop a city for signoff while we were setting up the transition. A real wall structure was replaced in cg and added foliage, shot in country lake location on bluescreen with the correct lighting helped soften the structure.

The Desert
The shoot team carried on to monument valley, where an intense wrangling of horses over a huge distance was shot.
The move of the camera on a dolly track had to be done twice. Once linear for the loop and in-between scenes and secondly for a slowdown transition where the same linear entrypoint would transition to a move which slowed to a stop with a ten second living hold. This meant choreography of action was crucial. That said wrangling a group of horses with these instructions with riders was rather limited. Interactive dust and horses travelling close to camera were added.
The depth budget was tricky in this case as the foreground riders were pushed in stereo but then the buttes (rear canyon formations), which were 1km away, were flat. Slight depth was forced but then we were travelling into space-scape where the depth wanted to be in the distance. The foregorund elements were added in space as previously mentioned but the transitions we realised in each case had to be constantly tweaked for depth consideration.
The Icescape
The icescape and planetscape both were evolving creatively up to the end which was possible as they were completey cg scenes. The difficulty was solving the scale issues from the cg world to real world items which needed to feature. Over the transitions picnic people, fairies over cracking ice, a galleon ship , penguins to horses. These all had to work together both in the loop and in their individual genre holding scenes for 10 seconds.
‘ We were embarking on a project that we knew would be challenging both creatively and technically. So it was extremely important to us that we found a post house that was prepared to be collaborative from the word go.
MPC helped us obtain our goal – to create our magical movie world!
Their knowledge & experience in the commercial & film world was crucial to help us provide an ident that has high production values. Every member of the team’s skills were utilised. It was testing. It was a pleasure working with MPC!’
Esther Wallace and Nick Tarte – Designer/Director
CREDITS
Client: Sky Network Marketing / Sky Movies
Agency: Sky Creative
Agency Producer: Sharon Kersley
Executive Creative Director: Clare McDonald
Creative Directors: Esther Wallace, Nick Tarte and Craig Marsh
DOP: Magnus Auggustenn
Post: MPC
Post Producers: Justin Brukman, Gen McMahn, Michael Stanish, Vittorio Giannini
VFX Supervisors: Matthew Unwin and Duncan McWilliam
VFX Team: Chrys Aldred, James Bailey, Jason Brown, Remi Cauzid, Maurizio De Angelis, Lacopo diLuigi, Michael Diprose, Dominic Edwards, Adam Elkins, Darren Fereday, Ahmed Garraph, Andreas Graichen, Michael Gregory, Liam Griffin, Alex Harding, Joey Harris, Richard Hopkins, Nicholas Illingworth, Spiros Kalomiris, Carsten Keller, Adam Leary, Duncan McWilliam, Jorge Montiel Meurer, Prashant Nair, Maru Ocantos, Vicky Osborn, Mikael Pettersson, Christophe Plouvier, Fiona Russell, Jim Spratling, Janak Thacker, Charlotte Tyson, Matthew Unwin, Fabio Zaveti
RELATED LINKS
(www.moving-picture.com)
Rango
The Making Of Paul
Sidekicks
Harry Potter and The Half-Blood Prince
The Last Minecart
Digital Magazine Motion Cover
Back to the Future
"Back to the Future," Einstein Jump
This is the first of several follow-up posts to our "Back To The Future" podcast on The VFX Show. Here's an objective breakdown of "Back to the Future"'s first big effects sequence, the first time slice of the movie that sends Einstein the dog forwards in time.
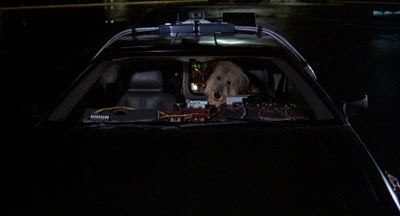

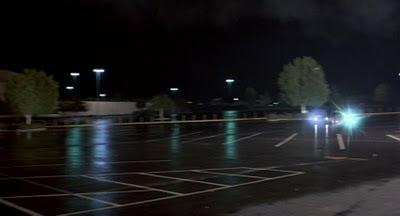
 Real photographic background plate of Delorean, with glows and time slice animation created by the animation department at Industrial Light & Magic.
 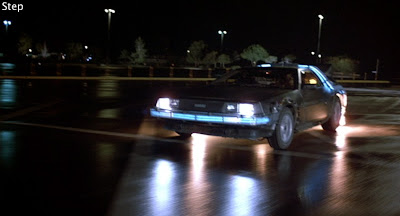 The fire and sparks (and their reflections) were created on the set with special effects rigs attached to the Delorean.
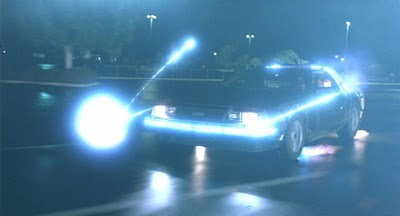
 A large strobe light on location provided bright interactive light. Full frame flashing was also achieved in the optical composite.
 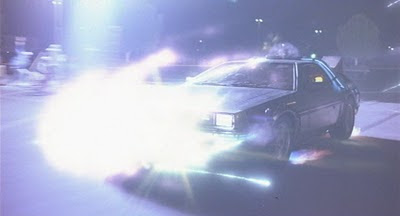 Hey, look in the upper left corner of the screen. Say hi to the crew!
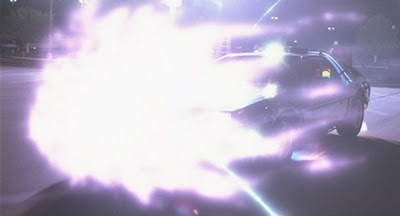
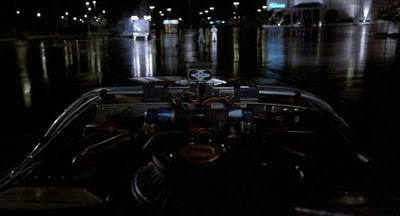
 Panning left with Delorean. The car is actually on the set, with animation and effects added optically.
 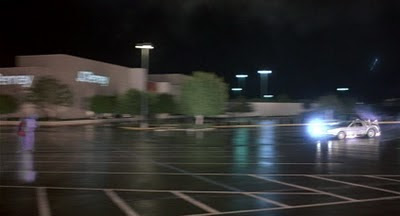 The pan reveals bluescreen-photographed Marty and Doc. The actors were tracked and matted into the shot.
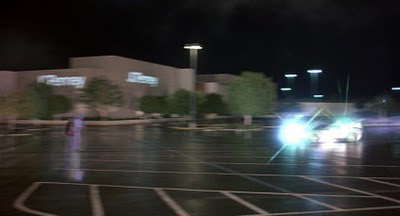
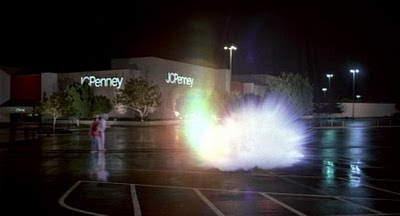 Pan abruptly stops, explosions and flares optically composited to represent time slice effect.
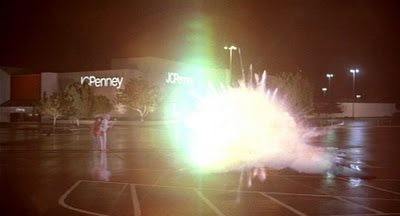
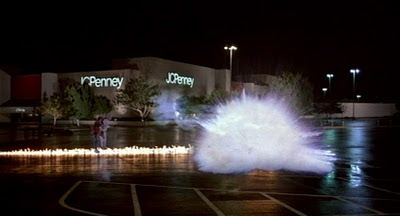
 First visible frame of explosion element. The main explosion element has a faked reflection in the wet ground, achieved in the optical composite.
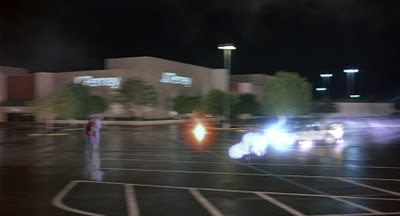
 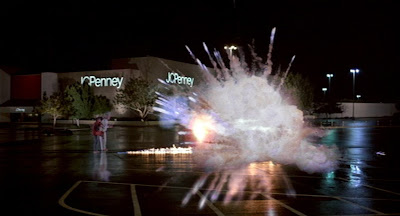 Explosion element runs backwards, giving the impression of an implosion. On-location, live-action ignition of fire trails appear, and are skip printed to appear to ignite much faster than reality would allow, approximating the feeling of 88mph.
 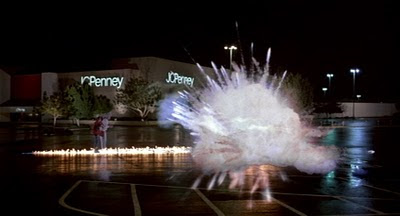 Marty's foreground foot is rotoscoped to allow the fire trail to appear behind his leg.
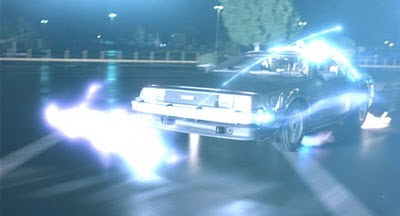
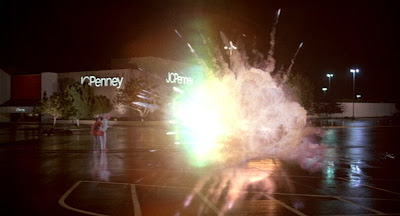
 The last frame of the shot.
 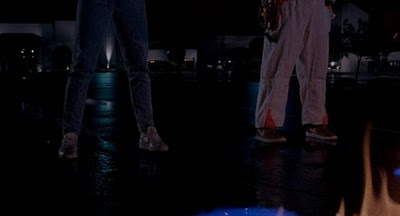 In-camera effect, featuring on-set fire trails, using stunt performers.
  This shot was skip printed in post production to give the ignition the feeling of greater velocity, giving the impression of the Delorean continuing its 88mph journey in a parallel dimension of time. As a result, the fire's motion is somewhat strobey.
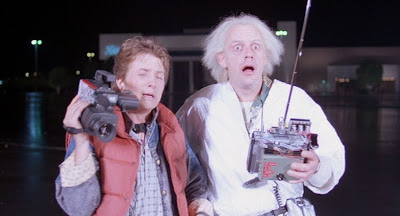
 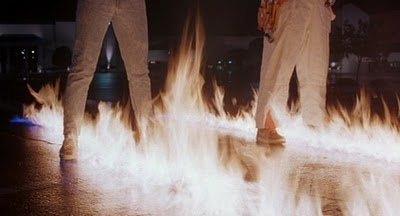 Notice the relative exposure difference between this shot and the shots preceeding and following it. In this shot, the cinematographer exposed the film to feature the fire (or was underexposed in the colortiming or visual effects process), which reveals the internal structure of the fire. In the shots before and after, the actors and environment were the target exposure values; consequently, in those shots, the fire is blown out and overexposed, leaving only hot white fire shapes.
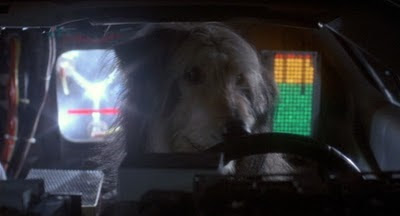
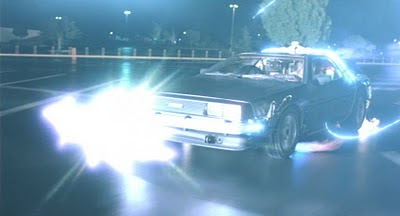
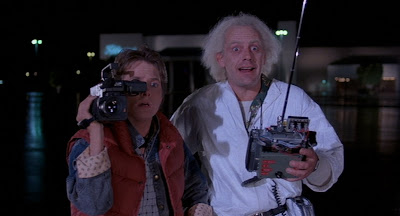
 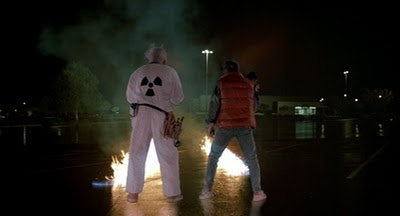 The first frame of the iconic Einstein time slice effect, featuring actors Christopher Lloyd and Michael J. Fox. The actors were shot against a bluescreen, standing on a mirror. The mirror gave the effects artists pristine reflections of the actors; the reflections were matted to separate them from the actors, and treated in the composite to appear as wet, pavement reflections by adding displacement and tweaking the brightness.
  Michael J. Fox's screen right foot was placed behind fire licks via frame-by-frame rotoscoping. Areas of fire were articulated to bury Fox's foot within the fire. Like the previous two shots, the background plate was skip printed to give the fire trails more energy and speed.
 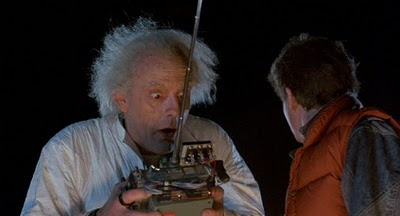 "What did I tell you?!?"
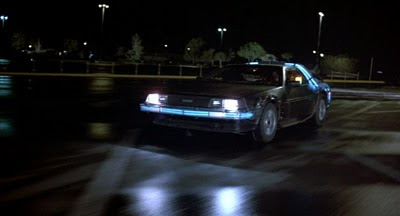
 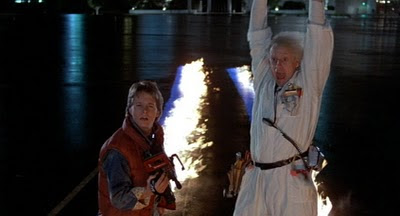 "Eighty eight miles per hour!!" This shot is entirely in-camera. The fire trails are a practical effect, just like all of the previous shots. In the sequence, the trails have been fully formed, and are no longer being generated; as a result, there was no need to skip print the trails for this shot.


 Real photographic background plate of Delorean, with glows and time slice animation created by the animation department at Industrial Light & Magic.
  The fire and sparks (and their reflections) were created on the set with special effects rigs attached to the Delorean.

 A large strobe light on location provided bright interactive light. Full frame flashing was also achieved in the optical composite.
  Hey, look in the upper left corner of the screen. Say hi to the crew!


 Panning left with Delorean. The car is actually on the set, with animation and effects added optically.
  The pan reveals bluescreen-photographed Marty and Doc. The actors were tracked and matted into the shot.

 Pan abruptly stops, explosions and flares optically composited to represent time slice effect.
 First visible frame of explosion element. The main explosion element has a faked reflection in the wet ground, achieved in the optical composite.
  Explosion element runs backwards, giving the impression of an implosion. On-location, live-action ignition of fire trails appear, and are skip printed to appear to ignite much faster than reality would allow, approximating the feeling of 88mph.
  Marty's foreground foot is rotoscoped to allow the fire trail to appear behind his leg.
 The last frame of the shot.
  In-camera effect, featuring on-set fire trails, using stunt performers.
  This shot was skip printed in post production to give the ignition the feeling of greater velocity, giving the impression of the Delorean continuing its 88mph journey in a parallel dimension of time. As a result, the fire's motion is somewhat strobey.
  Notice the relative exposure difference between this shot and the shots preceeding and following it. In this shot, the cinematographer exposed the film to feature the fire (or was underexposed in the colortiming or visual effects process), which reveals the internal structure of the fire. In the shots before and after, the actors and environment were the target exposure values; consequently, in those shots, the fire is blown out and overexposed, leaving only hot white fire shapes.
  The first frame of the iconic Einstein time slice effect, featuring actors Christopher Lloyd and Michael J. Fox. The actors were shot against a bluescreen, standing on a mirror. The mirror gave the effects artists pristine reflections of the actors; the reflections were matted to separate them from the actors, and treated in the composite to appear as wet, pavement reflections by adding displacement and tweaking the brightness.
  Michael J. Fox's screen right foot was placed behind fire licks via frame-by-frame rotoscoping. Areas of fire were articulated to bury Fox's foot within the fire. Like the previous two shots, the background plate was skip printed to give the fire trails more energy and speed.
  "What did I tell you?!?"
  "Eighty eight miles per hour!!" This shot is entirely in-camera. The fire trails are a practical effect, just like all of the previous shots. In the sequence, the trails have been fully formed, and are no longer being generated; as a result, there was no need to skip print the trails for this shot.
In a future post, I hope to dissect the shots more thoroughly from a subjective point of view, and expand upon ideas Mark, Mike and I discussed on the podcast.
Waterman vs. Sandman
Hereafter
Transformers
Transformers: Revenge of the Fallen
District 9
Iron Man 2
http://www.awn.com/articles/article/iron-man-2-gets-whiplash Read about the making of Iron Man's latest adversary